Rooftop (Korolyov Toweres)[]
- The Rooftop Map is an Attack/Defend map with 3 distinct stages for both teams. It strongly emphasizes team coordination and communication.
Map Feature[]
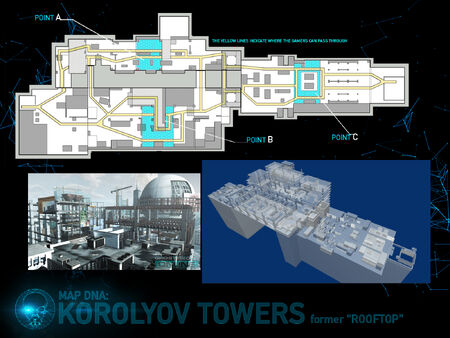
- Rooftops can be loosely separated into 3 distinct sections: Point A, Point B, and Point C. All of these points are long corridors, with large sections of cover scattered throughout. Point A has a sniper platform connected to the spawn of the attacking team, which allows for covering fire. Defending team has several positions to take, including a sniper platform. There is also an elevated piece of cover in the middle of the corridor, providing defense a strong position.
- Point B has much more cover, and a rather exposed platform near Defending spawn. Taking this position as the attacking team provides a relatively safe place to capture the point, while if defense can hold the platform, they get easy shots on the attacking team, and close off a flanking point.
- Point C is a very strong position for the defending team. Long corridors and ample cover near the defending spawn makes it difficult for an uncoordinated team to advance on the point effectively. Snipers have a major advantage due to the long range engagements. There is no efficient way to flank the defending team. If the attacking team can get onto point C, it is very difficult to dig them out again.
Tactic[]
- Attackers: The team should select a point and coordinate an attack. One or two players should cover the other point to prevent flanks. It is essential for the attacking team to attack quickly and efficiently. If they can overrun the defense and assume strong positions, the defense will have a hard time forcing attackers out. Once one point is down, Attack switches points and attacks. The attacking team will now have an opportunity to flank the second point. After both points A and B are captured, the attacking team must attempt to capture point C. APS,ADS, and BLITZ are very helpful in ferrying teammates onto point C.
- Defenders: The team should separate equally onto either point A or point B. Determine which point is in most danger of falling and send people to that flank. There should always be at least 2 people on each flank. Always pay attention to the status of each point. If Defense should lose one point, the rest of the team should head to the uncaptured point, with one or two players keeping watch for flanking attacks by Attacking team. If you should lose both points A and B, Defend point C with whatever you can. ADS, BLACKOUT, SCAN and CLOAK should be useful in the maze of structures.
- The key to victory is strong communication and coordination. Follow up your allies, be it an APS, ADS, or BLITZ. Capitalize on pushes and take strong positions, and reduce the enemy numbers as much as possible. Be observant for flankers, and cloakers. Situational awareness is important, so use your SCAN to the fullest. Good luck.
- Indianbagel (talk) 06:06, May 30, 2015 (UTC)
Screen Shots[]
Overhead View
Images


